


A Wall Mount Server Rack can free valuable floor space, but a compact enclosure still needs careful planning. It must support the equipment’s weight, allow adequate airflow, and leave room for cables and service access. Uptime Institute’s 2024 Annual Outage Analysis reported that 54% of surveyed organizations said their most recent significant outage cost more than $100,000. That figure does not mean rack choice alone prevents outages. It does show why small infrastructure decisions deserve attention.
Before comparing models, measure the wall, doorway, and equipment depth. Check the rack’s rated load against the actual weight of servers, switches, and power equipment. Look at ventilation, locking, cable entry, and door swing. A rack that fits on paper may still block a walkway or leave no space for a technician’s hands. Annoying, but common.
Andy Lawrence, executive director of Uptime Institute Intelligence, is a recognized data-center analyst. I could not verify a verbatim statement from him specifically about wall-mounted racks, so I will not invent a quotation. A practical takeaway from Uptime Institute’s reliability research is to match infrastructure to real operating conditions. This guide applies that idea to the Wall Mount Server Rack: comparing size, load capacity, cooling, security, and installation needs. Some choices depend on the room, not the product sheet. Measure twice.
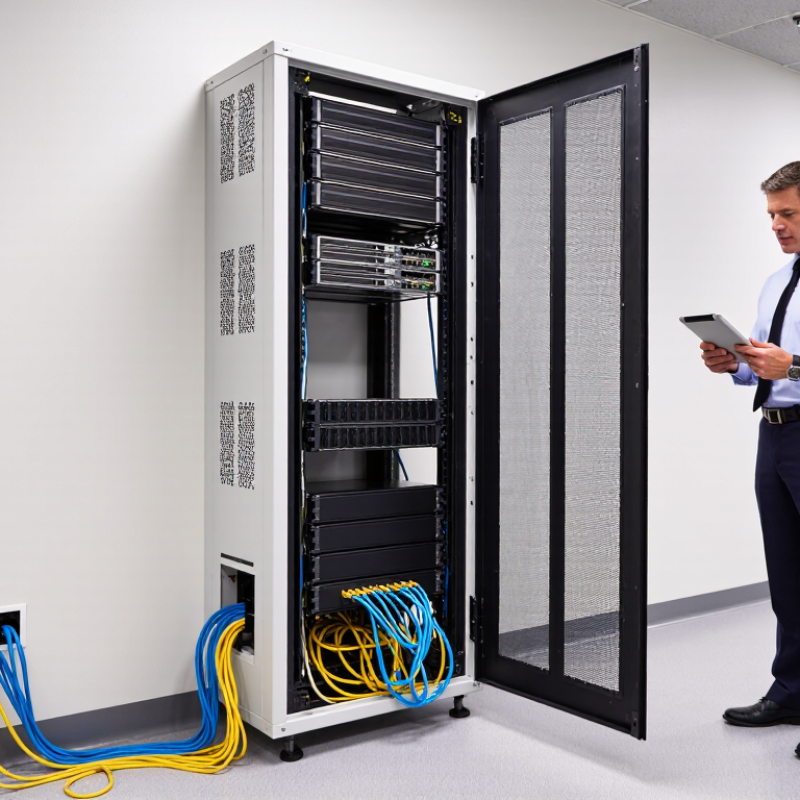
Choosing a wall mount server rack starts with the equipment, not the cabinet. List every server, switch, patch panel, power unit, and cable manager. Record each item’s height, depth, weight, airflow direction, and power connector. A short-depth rack may fit today’s switch, but newer hardware could need greater clearance. I have seen installations fail because the front door closed while rear cables bent sharply. That mistake was preventable.
Measure the wall, floor clearance, door swing, and service path. Leave space below the rack for tools and above it for ventilation. Calculate the loaded weight, then verify the wall structure and mounting hardware.
Uptime Institute’s 2023 Global Data Center Survey reported that 60% of operators experienced an outage during the previous three years. Power and installation weaknesses remain practical risks, not abstract concerns. Use measured power demand rather than nameplate values, and reserve capacity for expansion. My early estimates were often too optimistic.
Tips: Keep 20–30% usable rack space free. Provide separate cable routes for power and data. Check the rack’s thermal rating against the equipment load. Confirm grounding with a qualified electrician. Photograph the wall, cable paths, and final connections before closing the installation record. One overlooked connector can consume more service time than the rack itself.
Rack size should match current equipment and realistic expansion. Start by counting required rack units: a switch may need 1U, while a short-depth server can require 2U or more. Common wall racks range from 6U to 18U. Measure equipment depth, including power plugs and cable bend space. A practical allowance is at least 75 mm behind active equipment. Follow EIA-310 or IEC 60297 dimensions for reliable compatibility. Uptime Institute’s 2024 Global Data Center Survey reported that 53% of respondents experienced an outage within three years. That finding reinforces the need for orderly cabling and accessible maintenance.
Capacity includes weight, airflow, and future growth. Add the weight of every device, patch panel, shelf, and cable bundle. Keep at least 20% spare load capacity, although heavier battery systems may require more. My early mistake was choosing a compact rack that fit the hardware but blocked ventilation. It worked briefly. Poorly. For mounting, choose fixed brackets for light installations and swing-out designs for frequent servicing. Secure the rack directly to structural studs or suitable masonry, never only to drywall. Confirm the wall, fasteners, and rack rating together.
Tips:
How to Choose a Wall Mount Server Rack?
A wall mount server rack should fit the equipment and the room, not just the wall. Begin with ventilation. Perforated doors, side vents, and a removable top panel can improve airflow around switches and compact servers. Leave space above hot devices, and avoid placing the rack beside a heater or in direct sunlight. In field installations, I use a thermometer to check the upper section after several hours. Heat often collects there. Fans help, but noisy fans can become a workplace problem. Quiet is not always cool.
Security needs equal attention. Choose a lockable door and a strong mounting frame, especially in shared offices or public-facing areas. Confirm the wall structure before installation. A loaded rack can exceed expectations quickly. Cable management also deserves planning. Vertical organizers, labeled patch leads, and separate routes for power and data make maintenance safer and faster. Leave service loops, but do not create a cable nest. I once planned too tightly and had to remove several cables to replace one switch. That mistake was avoidable.
Power features should match the actual load. Check outlet quantity, circuit capacity, grounding, and surge protection. A rack-mounted power distribution unit can reduce loose adapters. For critical equipment, consider backup power and clear shutdown procedures. Keep power supplies away from airflow paths when possible. Every site has different limits. A neat drawing cannot replace an on-site inspection.
| Evaluation Area | What to Check | Practical Selection Guidance | Why It Matters |
|---|---|---|---|
| Ventilation and Cooling | Look for front-to-rear airflow, perforated doors or ventilation openings, and compatibility with fan kits. Check the equipment manufacturers’ cooling requirements and the rack’s installation clearances. | Choose a ventilated enclosure for heat-producing equipment. Add a fan kit when the equipment’s heat output or installation environment requires forced airflow; confirm that warm exhaust air can escape the room or enclosure. | Restricted airflow can cause equipment to overheat, throttle performance, or shut down. A fan does not help if hot air has nowhere to go. |
| Physical Security | Check whether the front door and removable side panels lock, whether the door can be reversed, and whether the enclosure can be secured to a structurally suitable wall. | For shared or publicly accessible spaces, prefer lockable doors and side panels. Keep keys controlled, and have the wall and fasteners assessed for the fully loaded rack. | Locks help deter casual access, while correct wall anchoring reduces the risk of the enclosure pulling away from its mounting surface. |
| Cable Management | Inspect top, bottom, and rear cable-entry openings, removable panels, cable-tie points, and the usable space for connectors and cable bend radius. | Choose entry points that match the site’s cable route. Leave room to route and label power and network cables without blocking ventilation or putting strain on connectors. | Organized routing makes servicing easier and helps prevent damaged cables, obstructed airflow, and accidental disconnections. |
| Power Features | Check available outlets, voltage and current ratings, plug type, circuit capacity, grounding, and compatibility with a rack-mounted power distribution unit (PDU). | Size the PDU and branch circuit for the connected equipment’s electrical requirements. Do not exceed the ratings of the receptacle, PDU, circuit, or rack accessories. | Matching the electrical supply to the equipment helps avoid overloads and supports reliable, safe power distribution. |
| Rack Size and Mounting Depth | Confirm the usable rack units (U), equipment mounting depth, enclosure depth, and clearance for rear connectors, power cords, and cable bends. A standard rack unit is 1.75 inches (44.45 mm) high. | Measure the complete installed equipment, including rear connections, rather than relying on chassis depth alone. Allow space for airflow and servicing. | A rack can have enough rack units but still be too shallow for the equipment and its connected cables. |
| Load Capacity and Wall | Review the manufacturer’s stated load rating and its conditions, including whether the rating applies to static or moving loads. Confirm the wall construction and mounting hardware. | Calculate the combined weight of equipment, shelves, PDU, and accessories. Use suitable fasteners attached to an appropriate structural support; seek qualified installation advice when needed. | Wall racks place a concentrated load on the mounting surface, so the rack rating alone does not establish that a particular wall can support it. |
| Rack Compatibility | Verify that the mounting rails support the equipment’s required rack width and that the enclosure is specified for the applicable 19-inch rack equipment format, such as EIA-310-compatible equipment. | Check rail adjustment range, mounting-hole type, included cage nuts or screws, and any required shelves for non-rack-mount equipment. | Compatibility checks help prevent installation problems and ensure equipment can be secured properly. |
| Access and Serviceability | Consider door swing, removable or hinged sections, access to rear connections, and the working space available around the installed enclosure. | Choose an opening direction and service layout that suit the room. Make sure technicians can reach fasteners, cables, and equipment without blocking exits or walkways. | Good access reduces maintenance time and lowers the chance of disturbing neighboring equipment or connections. |
A wall mount server rack should fit your equipment, wall, and working environment. Measure each device’s width, depth, and height before choosing the rack. Standard 19-inch equipment may still need extra rear clearance for cables, power supplies, and airflow. Check the rack’s usable mounting depth, U capacity, maximum load, and door swing. A small error here can make installation surprisingly difficult.
Safety standards matter as much as physical fit. Confirm that the rack supports proper grounding and complies with applicable electrical, fire, and building requirements. Inspect the wall structure carefully. Masonry, concrete, and wood studs require different anchors and load calculations. Keep the rack away from water pipes, heat sources, and blocked ventilation paths. In one installation, I allowed too little space above the rack; heat built up faster than expected. That mistake changed the final layout.
Tips: Leave room for cable bends and future equipment. Use a level during mounting. Verify the combined weight of devices, batteries, and accessories. Keep heavier equipment low. Check door clearance and service access before drilling. A second person should support the rack during installation. Recheck every anchor after loading the cabinet. Also question the plan once more; a neat drawing does not always match the real wall.
A wall mount rack should match the equipment you have, not just the space on the wall. Steel cabinets often offer strong load capacity at a practical price, while aluminum can reduce weight but may cost more. Check the rack’s rated load and your wall’s structure separately. A full switch, patch panel, and UPS can place substantial force on a small area. Use the manufacturer’s load rating, and confirm suitable anchors with a qualified installer. Don’t forget depth: a cabinet that closes around a switch may still leave no room for rear cables or airflow.
Leave space to grow. IDC’s Data Age 2025 report forecast 175 zettabytes of global data by 2025; that forecast is not a rack-sizing formula, but it reflects continuing demand for digital infrastructure. Reserve spare rack units and depth for likely upgrades, plus room for cable bends and ventilation. ASHRAE’s thermal guidance gives a recommended inlet range of 18–27°C for many classes of IT equipment; crowded cabinets can make that harder to maintain. Plan for breathing room. I would rather admit that expansion estimates are imperfect than buy a cabinet with no spare capacity. Still, extra space has a cost, so compare it against the price of replacing an undersized rack, including new anchors, cabling, and installation.
5107 County Road C
Manitowoc, WI 54220
920-726-4526